

![]()
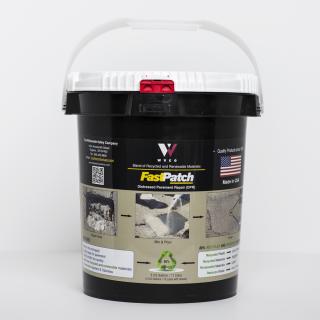
FASTPATCH DPR Rapid Concrete Repair is an easy-to-apply, long-lasting, high-load bearing, polymeric concrete repair material for distressed pavement. FastPatch DPR Rapid Concrete Repair is supplied in complete, ready-to-use kits with a polymer blend of recycled and renewable materials. Each kit comes with two color options of Gray or Black, and both Gray and Black topping sand to blend repair areas with the surrounding pavement. FastPatch DPR Concrete Repair can be applied in cool or warm conditions, and in cold conditions with the aid of FASTPATCH Kicker accelerator (free upon request), to form a permanent repair that is quickly ready for traffic.
WHERE TO USE
- Roadways - concrete spalls, concrete crack repair, concrete joint repair, broken corners, surface leveling and more
- Airports - repair spalls, wheel path areas, approaches and departures
- Parking Lots - repair holes, walkways, broken areas
- Micro-Trenches – roadways, joints, utility cuts
- Warehouses - concrete floors, concrete spalls, loading areas
- Sidewalks - repair concrete trip hazards, walkways, "repair instead of replace"
- Pothole repair - Permanently repair concrete potholes in just minutes. Prep (clean and dry), mix the pre-measured kit, pour, finish with included topping sand, done.
FEATURES AND BENEFITS
- Easy-to-Apply - Mix with cordless drill, pour, & finish in minutes
- Lasting Repair - Excellent adhesion & absorbs impact
- Fast Curing - 1 hour at 75°F or 2-3 hours for 50-65°F.
- Open to Traffic Quickly - Reduce traffic interruptions
- 80% Recycled & Renewable Materials - Sustainable sources
- Odorless - 100% solids & suitable for indoor applications
- Freeze-Thaw Resistant - Long term repair for colder climates
FASTPATCH DPR Concrete Repair is:
- Pre-Measured
- Self-Adhering
- Low moisture sensitivity
- Flexible
- Extendable with larger aggregate. Increase yield up to 30% with addition of 1 gallon of 3/8" (clean & dry) common pea-gravel.
- Also available in a 5000 psi version to meet FAA aviation specifications. Please Contact Us with your request.
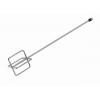
Recommended mixing tool: Eggbeater Style Mixer
FASTPATCH DPR Rapid Concrete Repair is a high performance rapid cure polymeric concrete that provides long lasting, durable repairs that allow for rapid return to service, within an hour of installation. FASTPATCH DPR Concrete Repair contains a blend of recycled and renewable materials.
KIT CONTENTS:
- Polymer Part A
- Polymer Part B
- Black Color Agent (optional use)
- Treated RG Aggregates
- Topping Sands (Natural and Black)
- Nitrile Gloves
- Scraper
- MSDS
- Instructions
PACKAGING: 5-Gallon Pail
COLORS: Gray or Black
UNIT VOLUME: 0.40 CF
YIELD: 5-Gallon Kit = 3.0 US Gal (11 Liters)
YIELD (Extended): 5-Gal Kit + 1-Gallon 3/8" Pea-Gravel = 4.0 US Gal (14.66 Liters)
Recommended mixing tool: Eggbeater Style Mixer
Click to view bulk pricing.
Before handling, you should become familiar with the Material Safety Data Sheet (MSDS) regarding the risks and safe use of this product. The MSDS is included within the product packaging. For a copy of the MSDS please Contact Us with your request.
Print or Download this Installation Guideline: FastPatch DPR Installation Guidelines.pdf ![]()
INSTALLATION GUIDELINE:
FastPatch DPR Kit
Preparation
- Store kit in cool location until time of use (65-75F, 40C) to maximize working time.
- Repair area must be free of any loose materials. If necessary, remove loose materials using a digging bar, grinder, concrete saw, or chipping hammer.
- Repair area must be sound and not hollow. Test by tapping with hammer and removing any areas that are dull or hollow sounding. Bonding surfaces must be dry and free of oil or other contamination.
- Asphalt repair areas with soil in center must be compacted with a hand tamp, truck tire, or plate compactor/jumping jack. The quality of compaction will determine the longevity and effectiveness of the repair.
- Clean the repair area with a high velocity and CFM blower (250 MPH / 700 CFM) blower or dry compressed air (120 CFM / 90 psi) at least 4-6 feet (1-2 meter) away from repair area.
- If necessary, remove any remaining dried dirt and debris from all bonding surfaces with a steel wire brush. Repeat blower to remove dust and debris.
- Ensure dryness. Damp areas must be dried. Use a heat lance or torch until bonding surfaces are completely dry.
- Test repair area bonding surface cleanliness by wiping surface with a clean glove and no moisture, dust, or oil transfers to glove. Repeat preparation if material transfers to the glove.
- Monitor dew point during operations to avoid applying over a damp surface.
- Honor all joints or moving cracks with foam board or by sawcutting after installation. If necessary, protect surrounding surfaces of repair area and joint with tape.
Installation
- Wear personal protection (e.g., safety glasses and gloves).
- Mix kit within 12 ft. (4 meters) of repair area.
- Use an ‘Eggbeater’ style mixer. Do not use paint ‘Spiral, Mortar, Fin’ style mixer. (OPTION 1). Recommended mixing tool: Eggbeater Style Mixer
- Open PART A over the mixing container by tearing at an angle the notched corner of the pouch.
- Pour PART A in the center of the mixing container and roll the pouch from the bottom to the torn corner. Dispose of the empty rolled pouch in the plastic bag. (OPTION 2 & 3)
- Place Eggbeater mixer at the bottom PART A mixture. Turn drill ON and slowly increase speed while moving mixer in the material to start blending material.
- Mix at 300-500RPM for 1 to 2 minutes while scraping bottom and sides of container with mixer to prevent unmixed material. (OPTION 4 & 5)
- Open PART B over the mixing container by tearing at an angle the notched corner of the pouch.
- Pour PART B in the center of the mixing container and roll the pouch from the bottom to the torn corner. Dispose of the empty rolled pouch in the plastic bag. (OPTION 6)
- Mix at 300-500RPM for about 45 seconds to 1 minute while scraping bottom and sides of container with mixer. At cold temperatures a slightly longer mix time can help maintain the rapid cure rate and ensure proper crosslinking. At hot temperatures mix at the recommended time and pour immediately. Do not under mix.
- After mixing, you can set the mixer head on the pail lid while pouring material in repair area.
- Immediately pour and spread repair material over area and up to the surrounding elevation. (OPTION 7).
- Use a trowel, taping knife, or screed board and work the material toward the edges and level with the surrounding elevation.
- Apply topping sand to refusal when sand slowly sinks and more than 50% stays on surface.
- Place the mixer in the empty mixing container and spin extra material off of the mixing blade. Using a disposable towel, wipe off mixer until clean.
- Repair area is ready for traffic when it is firm and doesn’t deform under pressure.
Options:
- Increase Self-leveling Consistency a. Remove 0.50-1.0 gal 1.5-3.0 liters) of Aggregate from kit before adding Part A. (Step 3)
- For Faster Curing Time (during Cooler temperatures) a. Pour PART A in the center of the mixing container and roll the pouch from the bottom to the torn corner. Dispose of the empty rolled pouch in the plastic bag. (Step 5).
- Black Color a. Pour PART A in the center of the mixing container and roll the pouch from the bottom to the torn corner. Dispose of the empty rolled pouch in the plastic bag. (Step 5).
- Increase Yield of FastPatch DPR - Extending before pouring into repair area.
- To Slow Curing Time (during Hot temperatures) a. Store kit in cool location until time of use (65-75F, 40C) to maximize working time. Mix kit close to repair area to minimize time between mixing PART B and pouring into repair area.
- Slope Grade Consistency a. Create a slope grade material to transition to different elevations (1.0 – 2.0 inches or 25-50mm).
- Add Multiple Kits in Same Repair Area a. Start at one end of the repair area with the first kit and fill up to surrounding elevation. Continue pouring material toward the other end of the repair area.
b. Continue with Step 4.
b. Add 1 bottle of Kicker to mixture after Part A and before mixing. Black Color is also added at this step (optional). Continue with Step 6.
b. Open Black Color pouch over the mixing container by tearing open pouch at notch. Squeeze into center of the material. Kicker is also added at this step (if needed). Continue with Step 6.
a. Mix PART A and Aggregate according to instructions above. (Step 7)
b. Add FastPatch Gravel (Clean, Dry, Rounded 3/8” 10mm) at 0.50-1.0 gal (1.5-3 liters) into mixture. Mix for 1 minute before adding Part B.
- Extending after pouring into repair area.
a. If material is below surrounding elevation by 0.25-0.50 inch (7-13 mm), immediately add FastPatch Gravel (Clean, Dry, Rounded 3/8” 10mm) until level with surrounding elevation.
b. Immediately mix gravel into material with a trowel to fully encapsulate gravel and before material sets. Apply topping sand according to above instructions.
b. When kits are very warm, limit mix time of PART B to about 1 minute at 300-500RPM while scraping bottom and sides of container with mixer. Make sure entire kit is thoroughly mixed before pouring into repair area.
b. Mix PART A and Aggregate according to instructions above. (Step 7)
c. Add FastPatch Gravel 0.50-1.0 gal (1.5-3 liters) into mixture.
d. Add ½ bag of Topping Sand (3 lbs., 1.4kg) into mixture.
e. Mix for 1 minute before adding Part B.
b. Taper the last 0.5-1.0 ft. (150-300 mm) of the first kit material.
c. Pour the next kit over the tapered material and up to the surrounding elevation and taper again for the following kit. Repeat until entire repair area is filled.
Troubleshooting: Cause & Corrective Action
 Cures too fast.
Cause:
- Kit material, aggregate or liquids, is too warm. Set time is 7 minutes at 110F (40C) and 30 minutes at 75F (21C).
- Part B mix time is too long or left too long in the bucket.
Corrective Action:
- Store kits in a cool (65-75F), dry, shaded area for at least 24 hours before use.
- While working, keep kits in cool location until needed to maximize working time.
- Make sure mix time of PART B is 1- 2 minutes and kit is used immediately.
 Cures too slowly.
Cause:
- Kit material is cold and repair area is cold. Store kits in a dry area at 65-75F.
- Center of the repair area will cure faster than the sides in cooler conditions.
Corrective Action:
- Use the KICKER in cooler conditions. Set time at 40F (10C) is 40 minutes with a KICKER and 80 minutes without a KICKER.
- Warm repair area with a heating source.
 Color is ‘greenish’, not gray or black.
Cause:
- Poor mixing of the aggregate and liquids.
- Not scraping sides and bottom of bucket while mixing.
Corrective Action:
- Use “Eggbeater” mixer to mix kit. Scrape sides and bottom while mixing. Other mixer styles, “Mortar Mixer or Blade/Fin Mixers” will result in poor mixing and unmixed material that will not cure.
- Make sure mix times are followed (2 minutes). Scrape sides and bottom while mixing.
 Not curing or hardening after several hours.
Cause:
- Poor mixing of the aggregate and liquids.
- Not scraping sides and bottom of bucket while mixing.
- Wrong style of mixer was used.
- Entire amount of liquids in kit was not used.
Corrective Action:
- Use “Eggbeater” mixer to mix kit. Scrape sides and bottom while mixing. Other mixer styles, “Mortar Mixer or Blade/Fin Mixers” will result in poor mixing and unmixed material.
- Use the entire kit. Do not divide liquids.
 Repair area cracked.
Cause:
- Repair area had an existing crack or joint that is moving after being repaired.
Corrective Action:
- Honor active cracks or joints by installing a foam board during installation of repair material or saw cut the active crack/joint after repairing. Install EJC-100 Joint Sealant material in moving crack/joint to seal area.
View or download the Product Label: FastPatch DPR Kit Label.pdf ![]()
How-to Photos and Videos for FASTPATCH DPR Kits for Concrete Repair
View the FASTPATCH DPR How-To Photo Gallery
Watch the demonstration videos:
FastPatch DPR (Distressed Pavement Repair) How-To Video
FastPatch DPR Airport Spall Repair
 View more FASTPATCH DPR How-To: Videos
View or download the FastPatch DPR Technical Data Sheet: FastPatch DPR Technical Data Sheet.pdf ![]()
View or download the FastPatch DPR ASTM Testing Data Results: FastPatch DPR ASTM Testing Data Results.pdf ![]()
![]() 80% Recycled and Renewable Materials.
80% Recycled and Renewable Materials.
Recycled filler material. Recycled plastic pails. Binder is renewable from plant-based materials.
SHELF LIFE
1 year when properly stored.
STORAGE
Store and ship this product in a clean, dry, low-humidity, shaded or covered environment at 60-90° F (15-32° C).
DISCLAIMER OF WARRANTY
TEST RESULTS ARE TO BE CONSIDERED AS REPRESENTATIVE OF CURRENT PRODUCTION AND SHOULD NOT BE TREATED AS SPECIFICATIONS. WHILE ALL THE INFORMATION PRESENTED IN THIS DOCUMENT IS BELIEVED TO BE RELIABLE AND TO REPRESENT THE BEST AVAILABLE DATA ON THESE PRODUCTS, NO GUARANTEE, WARRANTY, OR REPRESENTATION IS MADE, INTENDED, OR IMPLIED AS TO THE CORRECTNESS OR SUFFICIENCY OF ANY INFORMATION, OR AS TO THE SUITABILITY OF ANY CHEMICAL COMPOUNDS FOR ANY PARTICULAR USE, OR THAT ANY CHEMICAL COMPOUNDS OR USE THEREOF ARE NOT SUBJECT TO A CLAIM BY A THIRD PARTY FOR INFRINGEMENT OF ANY PATENT OR OTHER INTELLECTUAL PROPERTY RIGHT. EACH USER SHOULD CONDUCT A SUFFICIENT INVESTIGATION TO ESTABLISH THE SUITABILITY OF ANY PRODUCT FOR ITS INTENDED USE. PROPER APPLICATION IS THE RESPONSILBITY OF THE USER. AS WITH ANY PRODUCT THE USE OF THE THIS PRODUCT IN A GIVEN APPLICATION MUST BE TESTED (INCLUDING BUT NOT LIMITED TO FIELD TESTING) IN ADVANCE BY THE USER TO DETERMINE SUITIBILITY. TESTING IS THE REQUIREMENT OF BOTH ENGINEERS AND CONTRACTORS ALIKE. WVCO DOES NOT WARRANT THE APPLICATION UNDER ANY OR ALL CIRCUMSTANCES.
To quickly preview an accurate shipping quote for your order, including quantity discounts, add all of your selected item(s) to your Shopping Cart, enter your Zip Code into the form and click the Get Quotes button.

Eggbeater Style Mixer
|
|
| Thanks for the best concrete repair products on the planet... DPR is awesome. J.D.... Read Full Review |
|
|
|
Great product! Made about 30 pothole repairs to 6000 sq./ft. parking lot in June of 2014 and have not had a single problem or reoccurrence since. Recommending to all our properties. Daniel at the support number was very helpful and knowledgeable.
Larry Fowlert
Lead Tech
EPM Property Mgmt. ... Read Full Review |
|
|
|
Previously had tried to repair a broken out corner several times with various home depot materials... never lasted. I tried the fastpatch material and am very pleased with the result. Install was straight forward and it looks very nice. It was nice to be able to color blend the surface with my existing pavement. 2 months in and so far so good. Thank you for a good product. ... Read Full Review |


